
Overview
前记
很久以前就想写这篇文章了,Android Lollipop 已经发布这么久了,迟迟没有整理,一直拖到了现在。
Material Design
肯定得说的是 Material Design。所谓 Material Design,直接引用官方的文档,还是不翻译了。
We challenged ourselves to create a visual language for our users that synthesizes the classic principles of good design with the innovation and possibility of technology and science. This is material design.
关于 Material Design,已经出现了很多的讨论可以参考,例如 如何理解 Google 的 Material Design 等文章,我也仍在探索中。
开始改造你的 APP
准备工作
更新你的 SDK,依赖 support-v7 相关的包,如果你使用 Gradle,以下是你可能会用到的依赖。
1
2
3
4
5
6
dependencies {
    compile 'com.android.support:appcompat-v7:21.0.+'
    compile 'com.android.support:recyclerview-v7:21.0.+'
    compile 'com.android.support:cardview-v7:21.0.+'
    compile 'com.android.support:palette-v7:21.0.+'
}
所有的 Activity 都必须继承 ActionBarActivity。如果原来使用的是 FragmentActivity(android.support.v4.app.FragmentActivity),可以不用修改,因为 ActionBarActivity 是它的一个子类。
所有的 themes 都必须继承 Theme.AppCompat。你的 styles.xml 可能是这样的:
1
2
3
4
5
6
7
8
<style name="Theme.Yours” parent="Theme.AppCompat.Light.DarkActionBar">
<!—- ActionBar/ToolBar 的颜色 —->
<item name="colorPrimary">@color/your_color</item>
<!-- Status Bar 的颜色 -->
<item name="colorPrimaryDark">@color/your_dark_color</item>
<!-- Use the accent color for your primary action button and components like switches or sliders. -->
<item name="colorAccent">@color/your_accent_color</item>
</style\>
使用 ToolBar
如果要使用 ToolBar 作为 action bar,首先需要设置 themes 为 NoActionBar (Theme.AppCompat.NoActionBar)。然后就可以将 ToolBar 作为一个普通的控件,放到布局中。
1
2
3
4
5
6
7
8
9
10
<android.support.v7.widget.Toolbar
        xmlns:app="http://schemas.android.com/apk/res-auto"
        app:theme="@style/ThemeOverlay.AppCompat.Dark.ActionBar"
        android:layout_height="wrap_content"
        android:layout_width="match_parent"
        android:minHeight="?attr/actionBarSize"
        android:background="?attr/colorPrimary"
        app:navigationContentDescription="@string/abc_action_bar_up_description"
        app:navigationIcon="?attr/homeAsUpIndicator"
        app:title="@string/menu_str"/>
在 Activity 或者 Fragment 中,将 ToolBar 设置为 action bar 即可。
1
2
3
4
5
6
7
8
@Override
public void onCreate(Bundle savedInstanceState) {
    super.onCreate(savedInstanceState);
    setContentView(R.layout.main_layout);

    Toolbar toolbar = (Toolbar) findViewById(R.id.your_toolbar);
    setSupportActionBar(toolbar);
}
运行后会发现在 action bar 上的 Menu 全部被收起来了,要点击右上角的三个小点才会出现,即使已经设置了 “android:showAsAction=”always” ”。最简便的方法是将 “android” 改成 “app”,然后添加 “app” 的命名空间。这是因为要使用 support library 定义的 showAsAction。
Using XML attributes from the support library Notice that the showAsAction attribute above uses a custom namespace defined in the <menu> tag. This is necessary when using any XML attributes defined by the support library, because these attributes do not exist in the Android framework on older devices. So you must use your own namespace as a prefix for all attributes defined by the support library.
1
2
3
4
5
6
7
8
<menu xmlns:android="http://schemas.android.com/apk/res/android"
      xmlns:app="http://schemas.android.com/apk/res-auto">
    <item
        android:id="@+id/menu_id”
        android:title="@string/your_str”
        android:icon="@drawable/your_icon”
        app:showAsAction="always" />
</menu>
这样还会存在一个问题,右上角的 Menu 项,在 Android Lollipop 以下的设备中,按下后,阴影效果如下图所示:
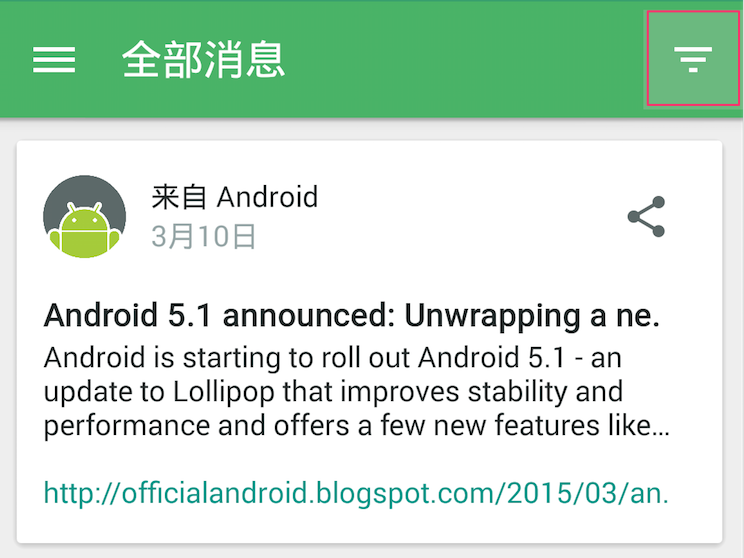
再看一下 Google I/O 的效果:
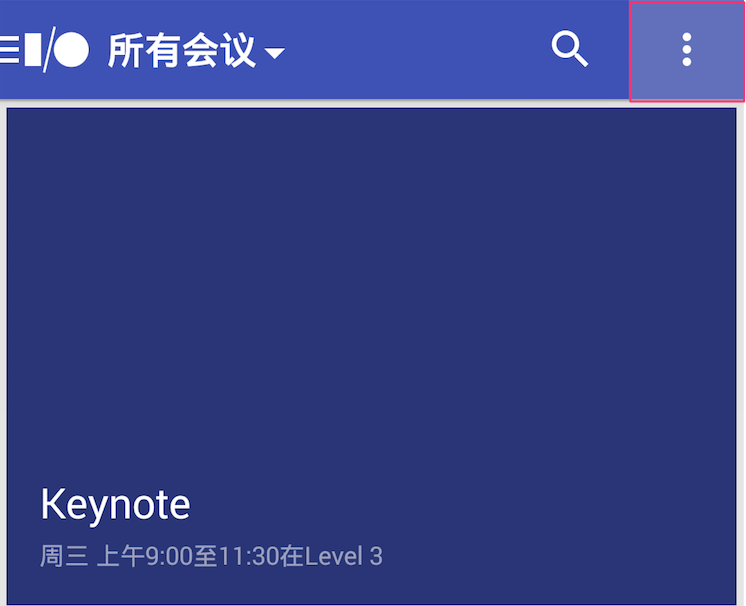
要想做类似 Google I/O 那样完整的效果,需要写一点代码。
首先,创建给 Menu Item 创建一个自定义的 View,menu_view.xml_。
1
2
3
4
5
6
7
8
<?xml version="1.0" encoding="utf-8"?>
<ImageButton xmlns:android="http://schemas.android.com/apk/res/android"
             android:layout_width="?attr/actionBarSize"
             android:layout_height="?attr/actionBarSize"
             android:background="@drawable/your_selector"
             android:src="@drawable/your_icon"
             android:scaleType="center"
             android:contentDescription="@string/your_str”/>
然后在 Activity 或 Fragment 中,给 Menu 设置这个自定义 View 就可以了。
1
2
3
4
5
6
7
8
9
10
11
12
13
@Override
public void onCreateOptionsMenu(Menu menu, MenuInflater inflater) {
    inflater.inflate(R.menu.your_menu_, menu);
    MenuItem menuItem = menu.findItem(R.id.your_menu_id);
    menuItem.setActionView(R.layout.menu_view);
    menuItem.getActionView().setOnClickListener(new View.OnClickListener() {
        @Override
        public void onClick(View v) {
               // TODO something
        }
    });
    super.onCreateOptionsMenu(menu, inflater);
}
使用 RecyclerView
Why RecyclerView ?
- 没有每个项的点击事件, onItemClickListener/OnItemLongClickListener
- 没有 divider,setDivider()
- 没有 selector,setSelector()
- 没有 header,addHeaderView()
上面提到的几点,RecyclerView 都没有,虽然都有替代的解决方法,但 Google 的用意何在。官方给出的 ReyclerView 的定义,「A flexible view for providing a limited window into a large data set.」,与此相对的是 ListView,它的定义是「A view that shows items in a vertically scrolling list.」。可以明显感觉出 ReyclerView 的使用范围要广的多,ListView只是用来展示垂直方向上的滚动列表的,RecyclerView 则没有那么多限制。
关于 RecyclerView,可以看看 First glance androids recyclerview,和 RecyclerView 相关的类,这位作者解释的很详细。
当需要定制 list 或者更多的动画效果的时候,RecyclerView 就派上了用场。添加或者删除一项的时候,ListView 就需要用到 Animation 类,用 view.startAnimation() 之类的方法,比较繁琐。RecyclerView 有 ItemAnimator,可以使用默认的动画 DefaultItemAnimator 也可以自定义,调用 notifyItemInserted() 或 notifyItemRemoved() 来触发相应的动画。
Pull2Refresh & CardView
曾经红极一时的 pull2Refresh 类库,现如今已经 DEPRECATED 了。想当年,大家争相使用此库来完成下拉刷新功能,时光飞逝,真是让人唏嘘不已。官方提供的 SwipeRefreshLayout 更加简洁好看,使用起来极为简单,在此不赘述了。
卡片式布局也和下拉刷新一样,当时为了实现卡片的圆角,写个 xml 或者用个圆角的图片作为控件的背景都曾有过。现在有 CardView,一切都变得很简单了。
Floating Action Button (aka FAB)
Floating action button: a circular button made of paper that lifts and emits ink reactions on press.
FAB 现在被广泛的运用在各个 APP 中。Github 上有很多的实现,例如 FloatingActionButton 和 android-floating-action-button,任意使用一个库都可以让你的 APP 轻松拥有 FAB。实际上自己实现也并不困难,但往往时间有限,且并不一定有意义去重复造轮子。
另外,在 Android Lollipop 的设备上,按下 View (不是所有 View) 会有涟漪一样的效果,有个开源库可以让 5.0 以下的设备也能享有这样的效果,RippleEffect。更有甚者,想让所有的 View 都有这样的涟漪效果,可以看 这个文章。
遇到的问题
根据 Material Design,Action Bar 和 Tab 融为一体的设计让很多使用小屏幕设备的用户频频吐槽,说屏幕的大部分都被占用了,遂决定在滑动的时候隐藏 ActionBar, 保留 Tab,类似 Google Play 商店的「我的应用」页面。
看了 Android Weekly 中的文章 How to hide/show Toolbar when list is scroling和 Github 上的一个开源项目 ObservableScrollView。前者的方案十分简单,给 RecyclerView 添加一个 header 或者 padding 就可以实现。而后者对现有的代码改动太大,实现复杂。所以决定采用前者的方法,但还是困难重重。
首先介绍一下原本项目的代码结构,一个 Fragment Main 使用 Tab + ViewPager,可以切换 Fragment A 和 B。Fragment A 和 B 里面有 RecyclerView,其滚动的时候要隐藏 Fragment Main 所在 Activity 的 ActionBar。没有使用 ToolBar 是因为在项目改造的时候,改成 ToolBar 要对代码进行很多的改动,每个页面都得设置它的名字,是个体力活儿。
在这样的结构之下,我用「How to hide/show Toolbar when list is scroling」这个文章的思想,在Fragment A 中直接使用了 HidingScrollListener,与它有所不同的地方是,我使用的是 ActionBar,所以在 onMoved() 方法里面,用了 actionBar.setHideOffset() 来随着手机的滑动来隐藏 ActionBar,使用 Tab.setTranslationY() 来滑动 Tab。然后出现的结果是,ActionBar 正确的滑动消失了,Tab 也跟着滑动占据了 ActionBar 的位置,但是留下了空白区域,RecyclerView 没有跟着滑动(即使设置了 android:clipToPadding=”false” )。随后还进行了多种尝试,对 RecyclerView 也进行移动,这样出现的结果是移动的过程十分闪烁。将 RecyclerView 的 padding 改成 margin,也同样不起作用。
与那篇博客不同的地方是,那位作者所有的元素都处在同一个 Activity 中,而我的元素分别处于三个不同的页面,也许就是同样的方法对我的项目不生效的原因吧。
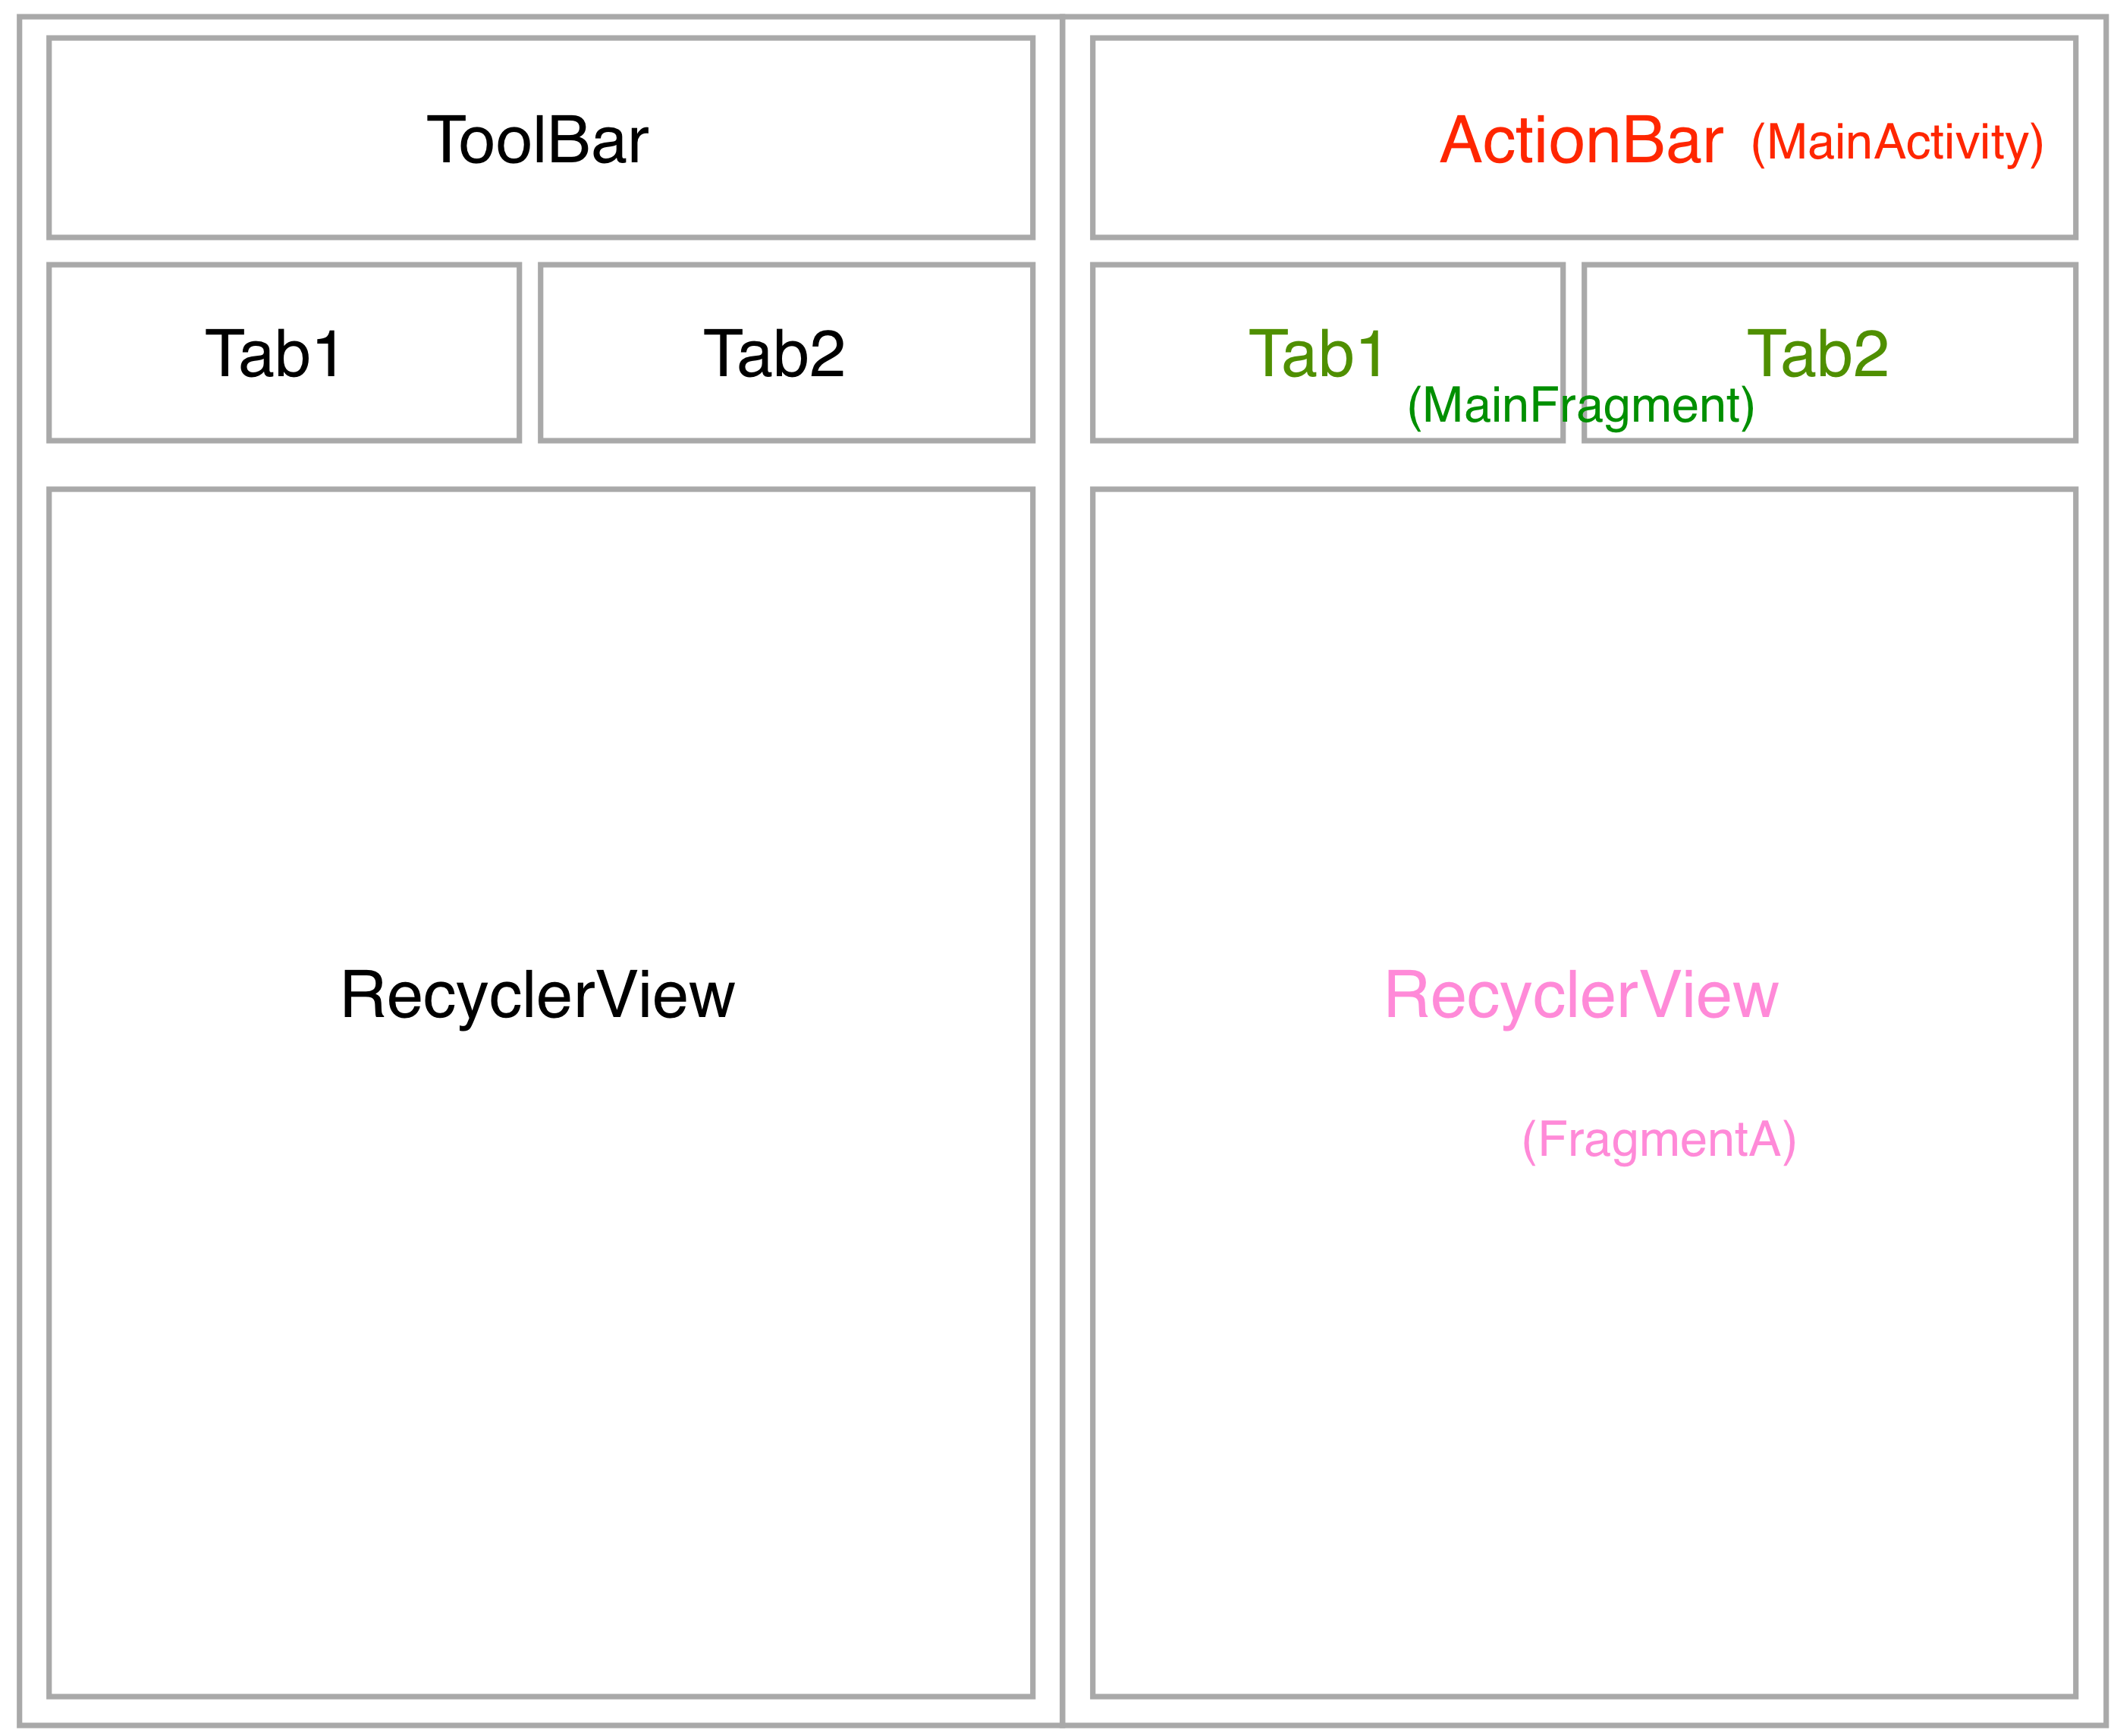
经过一系列尝试无果后,决定近期找时间使用 ObservableScrollView 对项目进行一次改造。
最后推荐几个应用
推荐几个符合 Material Design 的 APP,除了 Google 家的应用( G+、Play、I/O、Inbox等等等等),还有 PushBullet、RiceBook 饭本、Evernote等。